Saturday, October 31, 2015

Building a Skerry

Halloween Scarfing
  • Day Two: 1 hour
  • Total build time: 3 hours

Happy Halloween! Today, and the next few days are going to be relatively short ones. This is mostly because of the limited space I have available in my shop. 

Before I could get started today I had to run to the store and pick up some acid brushes. I would have thought they would have been included in the kit, but they are cheap so it was ok to stock up. After trimming them back a bit they are perfect for applying the epoxy to the scarfs.

I pulled the weights off of the bottom panel and was pleased to see a good, strong joint. I was a little concerned because the finger style scarfs that CLC pre-cuts in all the panels are very tight, and I was worried that I may just push all the epoxy out of the joint as I slid (pounded) them together, and end up with a glue-starved joint. I guess this is not a big risk on the bottom panel because the bottom is sheathed in fiberglass anyway, but the side panels don't have that reinforcement. With typical wood glue you need a super tight joint for the glue to bond successfully, but with epoxy there needs to be enough glue to create a material gap-filling bond. I hope CLC knows what they are doing! I imagine they probably do, but don't make me get out that Moaning Chair!

I started scarfing up the strakes today, but because I only have room to do one matching pair at a time it is going to take me a few days to get through the three sets of them. Today was #1, the "garboard strake" in the parlance of boat building. Probably a misnomer since stitch and glue boat building is a completely different process than clinker planking, which is where that term comes from. Plank #1 is the one which attaches to the bottom panel, and it's the first one to give the boat it's beautiful, curving shape.

On to the snaps...


Preparing for glue-up


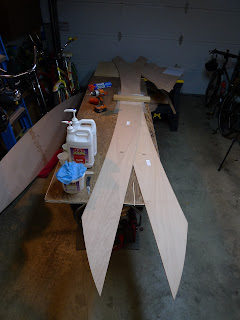
It is important that both strakes have the exact same profile, so during glue-up I "book-match" them, and clamp both scarfs at the same time so they have the same shape. Very interesting to think these long, swooping, flat planks are going to curve into the shape of a hull. So cool!


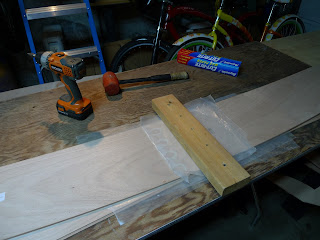
A simple piece of two by four screwed into the work bench makes a perfect clamp for both strakes at the same time.


The next few days will be more of the same, so I will batch the next group of scarfs into one post to save time. See ya in a few days!

Friday, October 30, 2015

Building a Skerry

My New Skerry Build
  • Day One: 2 hours
  • Total build time: 2 hours


They say that the two happiest days in a boat owner's life are the day they buy their boat, and the day they sell it. Well, I am not sure what that means for a boat builder, but if I figure it out this time I will let you know.

After building and sailing my West Mersea Duck Punt for the last few years I decided I wanted something a little different in a boat. I was looking to get back to a more traditional sailing craft, something with better upwind performance, room for two people, and a boat that could handle bigger and deeper water than would be safe or sane in the Duck Punt. After much deliberation I finally settled on building the Chesapeake Light Craft Skerry from a kit. 

A gorgeous Skerry with a sprit rig, the same rig as on my Duck Punt

A Skerry with a standing-lug rig and tanbark sail, sailing in blustery conditions! This is the rig I chose for my boat build. Very salty!


It took a while to put my garage/shop into boat building shape, but once I had things more or less organized it was only a couple of days before the kit that I ordered arrived. It was quite a few more days though before I finally decided to open it up and see what I had in the box. I was deliberating over whether or not to do a video document of the building process, and I finally decided to keep things simple and just do this journal. If I was taking the time to film every step it would take forever, and I want to get this thing built so I can go sailing!

Today being the first day was mostly spent just getting the parts inventoried. I did have time to epoxy the bottom panel together. As you may remember from the Punt build, with plywood only being 8 feet long and the boat being 16 feet long I had to "scarf" together panels to make pieces long enough to build the boat. CLC is kind enough to provide laser-cut finger-joint scarfs for their kits eliminating the need for hand-cut scarfs, and saving a huge amount of time and effort. You simply mix up some thickened epoxy, coat the joint, and press it together. Everything is perfectly aligned and oriented. It's great! I do need to make a caul though to simplify clamping, and apply more pressure to the center of the joint.

Tomorrow I will glue the side panels (called strakes) together and once that is done I can start stitching the hull together!


The large box is the boat kit, the standing box is the sailing kit, and the square box is the epoxy. The shop was still a disaster at this point. In the background you can see the most important tool in any boatbuilder's shop- "The Moaning Chair." Howard Chapelle had this to say-“In every amateur boatbuilder’s shop there should be a ‘moaning chair’; this should be a comfortable seat from which the boat can be easily seen and in which the builder can sit, smoke, chew, drink, or swear as the moment demands.”


Finally, more room to work!


After opening the box, we see the parts kit. Lots of little pieces to turn into a boat. CLC does a great job with packaging, and all the parts arrived without damage.


The laser-cut scarfs on the bottom panel. These are just awesome!


After epoxying the scarfs together, weight and clamps are used to make sure the joint lies flat while the glue cures. I sprung the ends just a bit to make sure the joints orientation is correct without any reverse bow.


Weight added to the middle of the joint to keep things flat. Make sure to use wax paper between the layers or you are going to really need the Moaning Chair!